Showing posts with label Welcome Rug. Show all posts

Sunday, March 24, 2013

Welcome Rug is Done!

I tend to enjoy the hooking considerably more than the finishing, so my rugs tend to spend some time rolled up in a corner waiting for me to be motivated enough to do the binding.  It was actually finished a couple of weeks ago, but I was waiting for some good light on the weekend to photograph it.


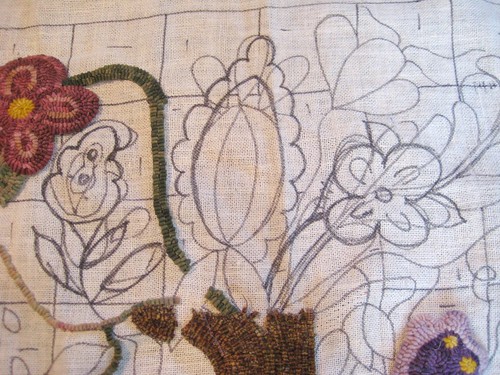
A few years back, I attended a primitive rug camp near Heber City, Utah (Daniel's Summit).  During some free time, we made a shopping trip to Heber City where I found this unmarked pattern drawn on white linen in a small quilt shop.  I have no clue who the designer was.  Nothing was written on the border of the pattern and it was the only item "hooking" related in the whole shop.  

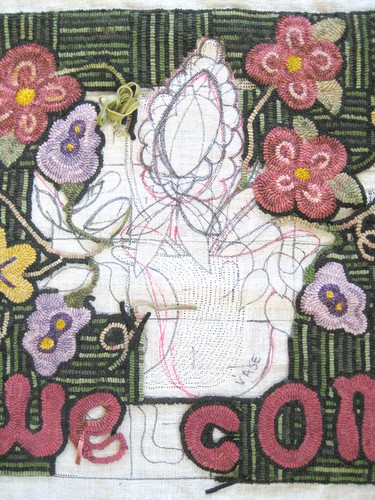
I made a few changes on the fly, including deleting a puddle and a duck and changing the container from a cornucopia to a woven basket.  I also added in the grid background (ala Gene Shepherd's Big Momma).

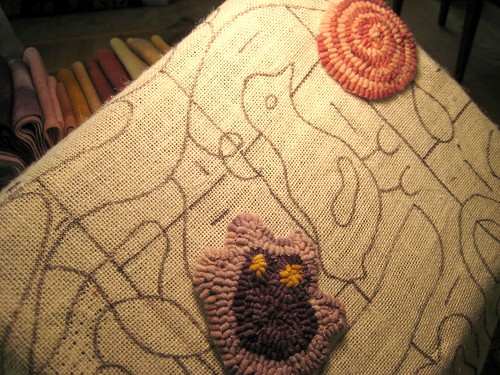
Every rug I make I try to learn something new.  This was the first rug I was brave enough to change the pattern from what was originally drawn.  I feel it is important to do whatever it takes to make a rug your own and make it sing for you.  I wish I had taken a photograph of the original pattern so I could share the changes I made.  That is something I will remember for next time!  Short of that, you can click on the "Welcome Rug" tag to see the other places where I blogged about this rug while I was working on it.

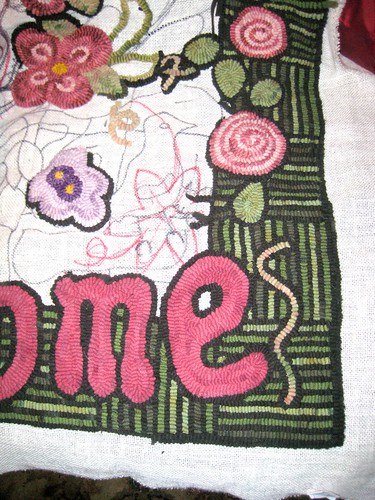
I love these little spiral lolipop flowers.

I modified this big blower a bit to make it appear to be a "mature" version of the other purple flowers

Beading used to simulate woven basket


Sunday, February 21, 2010

Craft Day at Mount Olive Church


My friend Lena invited me to go with her to the monthly Craft Day held at a church near her house in Milpitas.  There were 32 crafters of all varieties--quilters, scrap bookers, jewelry makers, knitters and two hookers.  It was fun to see what everyone was working on.  It was fun to be in a room with so many talented people enjoying the company of friends and working away.  

A few ladies stopped by to see what we were doing and we demonstrated how easy it was to those who were interested.  Lena met up with our new friend Janice a few days later and helped her get a pattern onto backing and gathered up wool for her so she can get started.  It is fun to see the excitement I felt when I was first exposed to rug hooking.  I couldn't wait to get started!

I was also able to make some headway on my rug, hooking a big portion of the basket that has held me back from working on the center for quite some time.  I did a Google search on images of "traditional rug hooking" and "baskets" and looked at quite a few other rugs with basket motifs before I came to a decision.  I didn't want it to be mistaken for a brown vase!  I just hope it isn't too distracting.  It is interesting that I don't see the irregularities in my hooking when it is in front of me, but when I look at a close-up photograph--wow!

Craft Day is held at Mount Olive Ministries at 1989 E. Calaveras Blvd., Milpitas in the Multi-Purpose Room from 9:30 am to 6:00 pm.  This event is not limited to the ladies at Mount Olive.  We provide the table space, munchies and lunch. There is a $5 registration fee, payable at the door.  Please RSVP so there will be enough tables ready.  When you RSVP, let them know if you will need power.

For more information or to RSVP, contact Connie Beal at (408) 262-0506 or Connie@mt-olive.org.

Rounding the Corner

I did some reverse hooking and then reworked the corner.  I decided it looked much better to go straight past the edge of the last whole block for a ways before I started rounding the corner (rather than start rounding right at the corner).  I'm much happier with it now.


I am on the homestretch on this rug now.   It has gone pretty quickly. 

Monday, February 15, 2010

Making changes ...


Ran across this photo in my flickr photostream where you can see more of original pattern.

Welcome Rug Update


2009-02-15 - Welcome Rug, originally uploaded by Sharlene W.

This is a perfect example of what not to do.


#1 - Have a plan in place before you begin. (All I knew for sure was I didn't like some things about this rug).


#2 - Work from the center out, not the other way around. (Um... the photo speaks for itself).


I'll explain myself--I worked the elements I was sure about first--it's not my fault they were all on the outside! I do know where I am going with this despite all visible signs to the contrary.


I also encountered problems with the upper corners.  After I had them hooked, they didn't appear symmetrical so I have redrawn them and I'm going to make another attempt.  Wish me luck!

Monday, February 8, 2010

Welcome Rug Progress


2010-01-26 - Welcome Rug, originally uploaded by Sharlene W.

I am finding I really enjoy the effect of the checkerboard stripes in the background. I find I do a much neater job if I work the lines vertically on my frame rather than horizontally. I had worked several squares before I discovered this. I think I also tend to pack a bit more than I should, so I am working on easing up a bit.


I have been following the challenge here on the internet by another hooking blog to hook at least 10 minutes a day. I will say that first 10 minutes is the most difficult as you have to make a decision to sit down and pick up the hook. Once I start, stopping becomes the issue. I enjoy it so much I have to tear myself away to get to bed.


One positive thing about the squares in the background--I always try to finish a square before I end for the day.


A couple of negative aspects to the stripes is the starts and stops required when you hit a motif in the middle of a square. I decided not to be anal about making sure every square started and ended exactly the same. I don't think it will show enough to worry about it, but the proof is always in the final product!


I have made enough changes on this rug, both from the outset to those made on the fly as I hook to give me the confidence to design my own pattern for my next rug. I am busy gathering ideas for it and the excitement of thinking about it motivitates me to get this one finished.


I am really loving the colors on this one, aren't you?

Tuesday, January 26, 2010

Why Overdye?


This is why I overdye. It gives the finished product so much more interest than a flat, solid color. This wool will be used in background of Welcome rug.  I started with Light Green (#101), Medium Green (#102), Olive Green (#104) and Antique Black. The formulas were outlined in a previous post.

Sunday, January 24, 2010

My apologies to whoever drew this pattern...


107, originally uploaded by Sharlene W.

... but I redrew many parts of it to please myself. I also drew a grid in the background because I wanted to try doing a background like I saw Gene Shepherd do in his Big Momma rug.

I took out a few elements I didn't understand being included with a vase like a chick, a puddle and what I think were raindrops. I replaced those three things with a few more flowers as well as changing the shape of a few flowers.


Now that I have marked it up big time, I wish I had taken a photo of the original design. I will try to remember to that if I ever adapt someone else's pattern in the future.


Another lesson I learned--do not use red Sharpie to make edits on your linen as it bleeds. I'm not worried about the results of that error because I am hooking with a yellow overdyed with old rose. If something bleeds, I am hoping it will look like it was done on purpose. Just as a precaution, I ironed the linen from the back in hopes that it would set the red ink. We will see...

The magic is nearly done


269, originally uploaded by Sharlene W.

I actually wrote down the formula when I dyed the first batch of background for this rug because I knew I would be needing more. I only dyed 1 1/2 yards initially because I wanted to see it hooked in before I committed to more.


I used 1/4 yard each of the 3 lighter colors (Dorr light green, medium green and olive green) and three 1/4 yard pieces of antique black. After soaking them, I scrunched up on the diagonal and then twisted each before placing them in a circular fashion around my pan. I added water until it was filled about 2/3 the height of the wool.


Dyes used: Forest Green, Old Rose, and Old Gold (all mixed 1/4 tsp to 1CBW)


Using a tablespoon-sized measuring spoon, I dribbled over the top:


3 Tbsp Forest Green (Pro Chem)
3 Tbsp Old Gold (Cushing)
2 Tbsp Old Rose (Cushing)


I then added the vinegar (about 1/4 cup) and mashed it all once with potato masher.


After letting the dye absorb for about 10 minutes, I added enough additional water to cover the wool and dribbled over the top:


7 Tbsp Old Gold (Cushing) (over all)
2 Tbsp Old Rose (Cushing) (mostly over the darks)


I mashed again and let steep over heat until most of the dye was absorbed.


IMPORTANT NOTE: The first time through I took the wool out and put it on a rinse/spin cycle. When it came out, I thought it needed more dye so I scrunched it up, twisted it and put it back in the pan. I think it benefited from this extra manipulation. This second batch was more heavily spotted in the areas that were on top and the bottom barely got any dye. The second batch was usable, but the first batch was LOVE-LOVE-LOVE. I know what to do next time for sure. Well, as we all know, practice makes perfect.

Coiled and ready to spot dye


265, originally uploaded by Sharlene W.

Starting a new (Welcome) rug

Thought I'd post the couple of photos I took when I started this rug. The date of the photo was 10-13-2009. There is something I love about the clean and promising start of a new rug.
This is a piece I picked up at a quilt shop in Heber City, Utah when I was there for a rug camp a couple of years ago. It was the only item related to rug hooking they had in the whole shop. There was no designer indicated on the linen, so I assume it is a one-of-a-kind pattern. There were some elements of the pattern I wasn't wild about, so I have changed a few things and I'm pretty excited about how it is turning out.

Wool dyed for the new rug (Welcome)

As it turned out, the green at the far left turned out to be acrylic, so it got tossed. The darker orange in the middle was too bright, so I used a minimal amount of it and later tossed it in the pot to pull out some of the dye. It is back in the mix now, but not as bright. All of the background wool was dyed separately.