Saturday, December 18, 2010

Planning the next step on Rapture...

I was at Safeway last night picking up a few things I needed a couple of nights ago.  I always like to browse through the flower display.  Although I don't buy them often, I do love to take in the variety and beauty while I am there.  Today there were a few bouquets with lilies, but this one in particular caught my eye.  It is perfect for the lilies on my Rapture rug.  I like the colors much better than the traditional Starflower lillies I found earlier.


I am off for the next two weeks and we are planning on a fairly low key, restful holiday, so for sure dying wool will be part of the agenda!  I am imagining a lovely dip dye.

Sunday, November 21, 2010

November Rugs from Peninsula Rugmakers Guild

IMG_3340
Gerri Shaw – Poppy (Connie Charleston pattern hooked with #3 cut directly on Dorr Wool)


Gerri's shading is exquisite!  I had to touch it to see if it was sculptured the shading was so perfect.


What a novel idea Connie Charleston had with hooking using wool as a backing.  Those of us who have struggled mightily sewing a pillow together will appreciate how much easier it will be for Gerri to make a pillow out of this piece. 


IMG_3343
Ardis Deane – (Actual Name Unknown – Deanne Fitzpatrick pattern)

Cute pattern using real (although miniature) clothespins.  Ardis plans to hang it in her laundry room.


IMG_3345
Ardis Deane – (Pattern & Designer Unknown)


Ardis calls this her Mt. Fuji gristmill -- maybe somewhere in Japan there is a gristmill with a pine tree and a river flowing by it.  Those mountains do resemble Mt. Fuji!

Tuesday, November 16, 2010

Hydrangeas - Redone

 
2010-11-16, originally uploaded by Sharlene W.

As you can see, I tore the hydrangeas flowerettes that I already hooked out and started over. The cluster isn't complete yet, but I think it looks MUCH better. The secret is adding a center to each flowerette as well as ensuring there is enough contrast. Before it was a blossom blur. Better?


I am using a 3 cut on the hydrangeas, but hope to do most of the rest of it in a 4.  I started out with a 4 here, but pulled everything out and started over with a 3 cut because 4 cut strips were just too big.

Tuesday, November 9, 2010

Shadows for the Hydrangeas (Dye Formulas)

After setting to work with my wool for my hydrangeas, I soon realized that what I was missing was dark wool for the shadows.  I had thought I could use the darker pieces of the initial wool dyed for these flowers, but I soon realized they were not dark enough.  I decided I need some dark lavender, dark blue/lavender and dark rosy wool.  Just in case I'm not happy with the results, I am only experimenting with 3/4 yard total, and I am documenting the process so that if I am trilled I can replicate it easily.


I prepare all of my wool by first tearing 18" length and then tearing that in half to get two  1/4 yard pieces.


I tore three 1/4 yard pieces of natural into 4 strips.


First 4:


1/8 tsp Pro Chem Lavender in 1 CBW
To this I lightly mixed 1 tbsp Prochem Brilliant Blue (1/4 tsp - 1 CBW)
I added 1 strip at a time, waiting about 45 seconds between


Second 5:
1/8 tsp Prochem Pink Sand in 1 CBW
Added 1 strip at a time, but waited until nearly all color was drawn up until I added last strip.
I then took all strips out and set them aside and to the water added 1/8 Tsp Lavender mixed with 1 CBW
I added strips back one at a time leaving them in about 45 seconds between BUT 2nd strip in was not overdyed first with Pink Sand.  Again I waited until nearly all dye drawn up before adding last strip.


Third 4 (Includes lightest strip from previous two processes):
1/8 Prochem Pink Sand and 1/8 Prochem Lobster Bisque mixed together in 1 CBW
Added 1 strip at a time leaving them in for about 45 seconds between strips.
Last strip in was light strip from previous two processes.


When it looked like all of the dye had drawn up, I tossed back all of the previously dyed strips and let them simmer together to set the dye.  I doubt if there will be any transfer of dye from one strip to the other because they were all pretty well set at this point, but if there is, it won't matter in the whole scheme of things.


I still feel like I am missing the green tone I want in these flowers.  I am awaiting a shipment of dye from Prochem before I commit to dying that wool.

Saturday, November 6, 2010

Squash


Isn't this marvelous!  It almost looks like someone painted them to get the effect.    What a beautiful display of color I ran across on Martha Stewert's website.  It reminds me of the fruit displays that are set up every fall during Peach Days in my hometown.

Thursday, November 4, 2010

Off to a less than spectacular start


Started putting in a few hydrangea petals tonight... ARGH! It is much more difficult than expected to get some definition between flowerettes. I expect some darker values for the background between petals will help, but I expect I won't be through dying. I vow not to engage in no reverse hooking until I have one whole mophead done no matter how frustrated I get! (However I refuse to make any promises about finishing a cluster of hydrangeas before I move on to something easier).
Posted by Picasa

Tuesday, November 2, 2010

Color Planning - Roses

Ah, with all of the colors roses come in, this should be fun.  If I do the lilies golden tones rather than the white edged pink Stargazers, I may go for the two-tone rose to add interest. I plan to save those roses for LAST.  I think the thought of working with 8-value swatches is the biggest thing that has kept me from starting this rug.


My plan is to study the rose carefully, proceed slowly (and sign up for a rug camp with a teacher who can help!)


Monday, November 1, 2010

Mmm... the wool is fresh from the dryer


A yard and a half of yumminess in the form of 6 quarter yard pieces of newly dyed wool fresh from the dryer.  I was very pleased with my success in replicating the colors in this painting of hydrangeas I found on the internet.  The color swatch is one I created by uploading the image to the Kuhlerhere. website.  You can find it and other hydrangea themes by using the search option or go directly to my by clicking


I know I will need to dye more wool for the hydrangeas, so next time I will focus on the darker purple tones and maybe a bit more yellows and greens.  My notes for dying the wool are on yesterday's post.   I'm so excited--I may have to cut some and dip my hook into that virgin linen backing...

Sunday, October 31, 2010

Dying for Hydrangeas

I have to say, Hydrangeas are my favorite flower without a doubt.  They play a major role in this rug--14 large clusters of them.  I played around with the colors on my favorite photo and pulled out some of the major colors on Adobe's Kuhler website.  It pulls out the major colors in a photo and is a great jumping off place for deciding which dyes to use.


From that, I realized I needed something rosy, tan, green, lavender and pinkish-purple.  I started out with Pro-Chem WashFast Acid dyes and mixed up 1/4 tsp in 1 cup boiling water of each:  Pink Sand (509), Mauve (313), Lobster Bisque (339), and Lavender (812).


I scrunched up the wool and then sprinkled out with tablespoon rows of each color, starting with Pink Sand and ending with a row of Lavender.  I smooshed it with a potato masher to spread the colors and then picked through the wool looking for any areas left undyed, adding dye as necessary.


Rows of color I put down -- before tweaking -- Doesn't look like Hydrangeas does it?


Again, I felt it was missing something, so I put spoonfuls of each color randomly around pan, smashing with masher again to spread color. Again feeling it was missing something, I spooned randomly a bit of very weak solution of Cushing's Forest Green I had left over from a previous rug.  It was getting close, but still missing something.


One of my daughters examined the pot and my photo and said -- blue.  She was right.  I rummaged around in my box and came up with only one pot of blue dye, Brilliant Blue (490).  I thinned it way down and then very carefully added a few spoonfuls here and there until it pleased my eye.  I liked it so well, I scrunched everything to one side and then,  threw in a couple more quarter yards of natural wool and dyed more purple/blue right alongside what was simmering.


Unfortunately, this is very much how I end up dying for my rugs.  I dye like I'm making a pot of spaghetti sauce--I start with a basic recipe and then add bits of this and that until I am happy with the results.  The unfortunate part is that it is difficult to replicate.  I figure with the Hydrangeas that shouldn't be a problem.  At least with the bread crumbs of knowledge I have stored here on this blog I might come close.

Saturday, October 30, 2010

Color Planning - Stargazer Lilies

Lena's lilies on her Rapture rug are spectacular.  I haven't decided yet whether I will follow her lead and have the lilies golden tones or attempt a realistic Stargazer Lily.  I love those Stargazers, especially the strong white edges and dark spots, but using the golden tones would help add more color variety and differentiate the lilies from other flowers.


Friday, October 29, 2010

Color Planning - Morning Glories

And now ... Morning Glories.  I am not a fan of blue in my rugs (I don't know why?), so I am leaning towards a purple/blue color for these.  I like the drama of the blue ones in the first photo with the pink center and dark star on petals.  They can't be too dark because I want them to show up on the dark brown background.  That would be easier if I were using a fushia color, but I need a variety of color and I think the Stargazer Lilies should be pink-ish.


Thursday, October 28, 2010

Color Planning - Foxgloves

It is always a good idea to look at photographs of real flowers to see the natural shading.  Here are a few photos I gathered of foxgloves that I liked.


Wednesday, October 27, 2010

Yes it is true.... I finished a rug!

I believe this Cat's Paw is a Jane McGown-Flynn design (I cut off the edges so long ago I can't remember).

It is funny what you notice when you look at a photograph of your rug.  I will just call that bit of dark purple in the middle of the bottom my POISON!  Where did that come from anyway?

Tuesday, October 26, 2010

Completed Rugs at Peninsula Rugmakers Guild - October 2010

Without further delay... the rugs that were displayed at guild last week: 

Roland Nunn - Tuscon

The postcard Roland adapted for Tuscon rug (from photo to pattern done by Jane Olson

Pat McRoberts - Santa pillow (although not a pillow quite yet)

Betty Montang - Native Woman

Karen Stein - Sheep Mat

Karen Stein - Thistle Pillow

Sharlene Washington - Cat's Paw

Bobby Alvarez - Scardy Cat

Monday, October 25, 2010

Color Planning - Hydrangeas

Here are a couple of photos of the colors I want to use in my Hydrangeas.  I am thinking of using a casserole dye technique--scrunching up the wool and then pouring the dye on in rows, then mashing with a potato masher to smoosh the colors together at the edges.  We did some like this in Michelle Macarelli's dye workshop and I have been waiting for an opportunity to try it out.


I think I will start with a hint of pale green, then a pale rosy pink, then pale blue.  Smooshed, I should get the green edges, pink, violet and blue.  Then maybe a separate dye pot with the darker rosy pink going from light on one end to darker on the other.  I need to get out all of my dye equipment and hopefully, I will have the right color dyes to get started.


\

Sunday, October 24, 2010

Rapture - Assessing the Pattern

One thing I did with my Art Deco Peacock Rug that really helped was to get color pencils and color a line drawing of the pattern.  It really helped me visualize where I was going with the rug and see how balanced the colors were.  Coloring the drawing also helped me figure out what lines went with what.  (Hasn't that happened to you?  You are hooking away and run into a line you can't figure what the heck it is).  This step was easy enough for Art Deco Peacock--there was a line drawing in the book.  For Rapture I had to create my own.


I spread the pattern on the floor and then got an overhead shot of it from my 2nd floor loft.  I printed the jpg out on plain paper, then used the copier to enlarge it to fill a full 8.5x11 page and printed that out in black ink.

Rapture - Jane McGown-Flynn - 72 x 44

Maybe I should have ironed it first!  It worked out anyway...


The colors are not an exact representation of the colors I plan to use, but it helps define the elements.  As I was coloring it I thought there were too many roses on one side and not enough on the other.  I quickly realized that some of what I thought were Morning Glories were actually rose buds.  The rug is not exactly symmetrical, but it is balanced.


At this point, it is a good idea to run a pencil firmly down the lines marking the edges of the pattern to ensure the pattern is drawn straight.  It can be annoying (and sometimes impossible to fix) when the pattern is drawn crooked and you don't discover it until you have a lot of hooking in.


Now I'm rather to start some wool gathering and dying.

Saturday, October 23, 2010

The Time to Start Rapture Has Arrived


2008-06-04 - Rapture has arrived, originally uploaded by Sharlene W.

I ordered Rapture (a McGown-Flynn pattern) over two years ago because I saw Lena Krinard in my hooking guild working on it and I fell in love. The pattern is 42x72 and is rather intimidating. I think I am finally feeling competent enough to tackle this.


I plan to do all of the dying myself. I did order some background through the guild from Dorr (a very dark brown called Elizabeth's Black). I decided to break it down by element to make it less overwhelming. In actuality there are only a few different elements


Roses -
Star Gazer Lilies -
Foxgloves
Hydrangeas
Morning Glories
Long pointed lily leaf
Morning Glory leaf
Hydrangea leaf
Rose leaf
Foxglove leaf


I did a Google Image search for each of the flowers and found virtually thousands of images to choose from. I selected a few of each variety that were colors I liked and that showed the detail of the different elements of the flower. This will be my jumping off point.


My goal is to fairly realistically depict the various flowers in an array of colors that are harmonious. I am going to take the same approach to dying that I did with my "November" rug, and that is to take one element at a time, dye the wool, hook an element, and then move to the next element, layering it in.  Wish me luck--I'm scared...


Here are some photos of Lena's Rapture Rug.  She started her rug in a class with Helen Connolly.  I think some of the formulas she used to dye her wool were from Helen, but others were things she has collected and dyed along the way.  You can see why I was inspired!


Hydrangeas

Morning Glories

Foxgloves and Rose Leaves

Foxgloves and Lilies

Love the Lily Leaves!


Wool for Lily Leaves

Wool for Lily

Saturday, October 16, 2010

Those Girls Know How To Do It!

The girls who are laying already each gave us a jumbo egg this week. Just as we suspected, they were both double yolkers!

Friday, October 15, 2010

Urban Farming

I ran across Suzanne McMinn's blog a while back.  The title caught my eye "Chicken In the Road" and I have enjoyed reading some of her posts.  She has chickens, goats and cows as far as I know, having given up an urban life for a more rural lifestyle.  Her post today was about making cheese from her own goats.  What fun.  It takes a while to mature, I can only imagine her excitement about cutting into that first round of cheese.


I'm a city girl, but just this summer plunged into urban farming by getting 8 chickens.  Of course I didn't ask my husband because he would have said no and then where would I have been.  When he met "the girls" he didn't object nearly as much as I expected (but what could he say at that point).  He said, "I really don't want to come home one day and find a cow on the back lawn".  Maybe he wouldn't notice a goat...

Saturday, October 9, 2010

A New Project...


Suzan Farrens from our South Bay Rug Hookers Guild brought over a stack of wool and quite a few started projects from an acquaintance, Sandra Fletcher, who passed away this March from cancer.  The money from the sale of the wool and patterns will be donated to WomenCare in Santa Cruz.  WomenCare assists women in all ways related to cancer:  emotional, educational, finding doctors, family and friend support -- they cover it all.  She also has a number of hooks that she is selling--the proceeds of which will go to Strike Out Against Cancer.


I ended up with three projects that had been started and abandoned.  The first one I couldn't resist starting immediately, even though I am in the middle of binding and finishing two other rugs.


Really, which is more fun for you--hooking or binding?  I prefer the hooking!


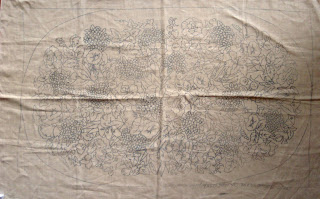
 The pattern is called "Old Time Oval" (PR1333) and is a Primco Pattern sold by The House of Price (designed by Dell Briffiths) and is 23 1/2 x 36 inches and is printed on linen. 


It was originally priced at $47 and has the name Laurie Wiles on tag with a 6/8 cut suggested.  I got the pattern for $15.  Laura Pierce made a comment below that Laurie was the teacher at Western and this was one of the classes Laurie taught there. 


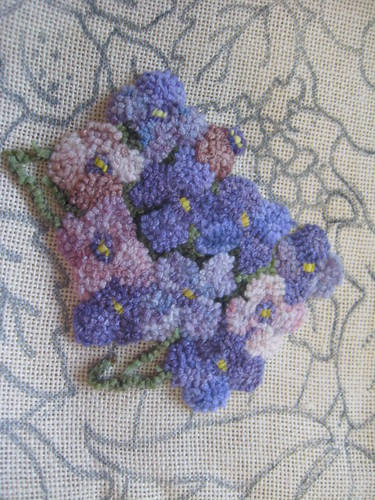
The hooking on the flowers on the right was already done.  I am working on the flower to the left and will probably end up pulling out what was already done before I started.  I want to get a bit more done before I do any reverse hooking.  My plan is to use the background I have left over from my "Welcome" rug as well as some of the wool from the flowers on that rug.  May as well use it up!

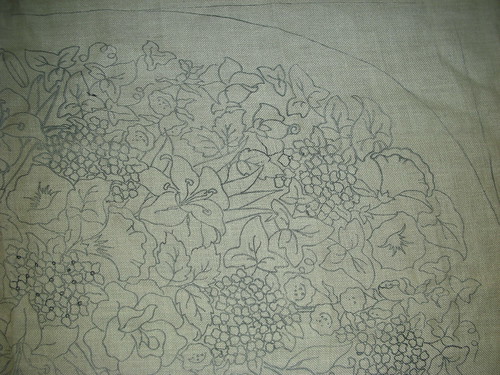
I'm not keen on the colors of wool that were with it.  They are casserole dyed primary colors all on one piece of wool going from bright yellow to red to blue.  They are a little bright for my taste.  There are more leaves and stems roughly drawn in center that I do like and plan to keep.  I'm not sure it will remain an oval, but I am sure the border will change.  We will see what I make if it over time.  I wanted to document the starting point on this rug.  The last rug I did bears no resemblance to its beginnings and I wish I had taken a picture before I took off and made all the changes.

Wednesday, October 6, 2010

Giant Pumpkin Update

My son has been growing this pumpkin in the backyard this summer.


We think it is at least 200 pounds.  I personally think it is closer to 300! (Note added in December -- the pumpkin ended up being 474 pounds!)


Now that it is October I told my son it is time to figure out how to get it to the front yard so the whole neighborhood can enjoy it!


Got any ideas how to move it?  I'm thinking my son and a few of his buff buddies should roll it up in a blanket and then roll the bundle to the front yard.


You can barely see the piece of plywood he put under it when it was a baby to keep it off the soggy ground.

Let's Get it Done Already!

I have a dirty little secret...


... I have a stack of unfinished projects.


Now you know.


I love the hooking, but for some reason I'm off to the next project leaving my beautiful rugs rolled up and stacked in the dark waiting for me to have the motivation to finally bind the edges.  What is funny, once I get started with the binding it isn't near as much of a chore as I had imagined. 


My Art Deco Peacock sat for about a year and a half (right along with my November rug that was finished a couple of years earlier).  It was so wonderful getting them up on the wall I couldn't imagine what took me so long to get them done.


I now have a small stack of other projects that are waiting for their moment of glory.  Time to get it done!   The first one I am taking on is a cat's paw that I just adore.  It has been so long since I serged the edges I can't remember who the designer was.


I decided to finish the edges with rows of hit and miss and now I'm binding it in a continuation of that pattern.  I like how it is coming out.


About 1 1/4 inch rolled toward front with no cord (fold half in and baste first)